Data Gathering
Introduction
One of the more challenging aspects when it comes to sizing a Veeam Backup and Recovery solution is gathering physical host information. Unlike with VMware where it is relatively easy to use well-known tools such as RvTools to pull relevant information out of the environment, physical environments do not have the convenience of a single free tool that allows you to gather this information.
In this guide, we will walk you through methods of gathering infrastructure information with native tools that you likely already have access to. However, if you have any other method of capturing this data such as an inventory tool we recommend using that instead.
Prerequisites
Windows:
- WinRM enabled on all hosts to be assessed
- WinRM ports 5985 and 5986 open on target servers
Linux:
- SSH enabled on each server to be assessed
- SSH key included in the trusted hosts file if an SSH key is required
Windows
Setting up Assessment server
Before moving forward with this guide, the following must be installed on the assessment server. Install Remote Administration Tools and Active Directory module for Windows PowerShell.
Windows Server:
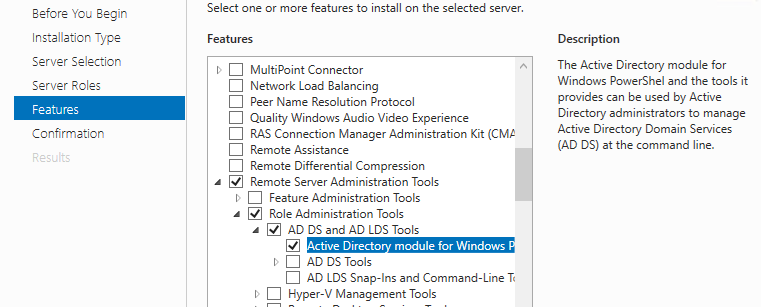
Windows 10:
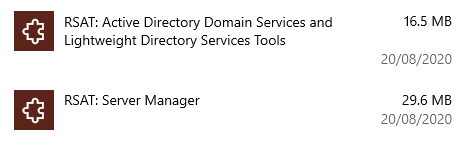
WIN+I (Windows Settings) Apps > Optional Feature > RSAT: Active Directory Domain Services and Lightweight Directory Services
These can also be installed via PowerShell:
Add-WindowsCapability -online -Name Rsat.ActiveDirectory.DS-LDS.Tools~~~~0.0.1.0

In either case, you will also need to install the PowerShell Active Directory Module which can be done via PowerShell:
Install-WindowsFeature RSAT-AD-PowerShell
Hopefully you have WinRM already enabled on the servers that will be assessed, otherwise you have to enable it. You can check if WinRM is enabled on the assessment server via this command:
Test-WSMan
You should see an output like this:

If you get back an error, then it is an indication that WinRM is not set up on your system. To set up the WinRM using quick config type the following:
winrm quickconfig
You can check the WinRM server connection settings via:
winrm get winrm/config/client
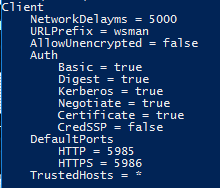
This shows the configuration for WinRM.
For you to remote to all the systems you will need to add the hosts to the Trusted Hosts on the assessment server. This can be done individually though this is restrictive or via a wildcard *.
Set-Item WSMan:\localhost\Client\TrustedHosts *
Set-Item WSMan:\localhost\Client\TrustedHosts *.yourdomain.com
The client configuration can be seen using this command:
Winrm get winrm/config/client
Note that for this guide ‘Negotiate’ will be used for authentication, the server will determine whether to use Kerberos or NTLM. Both options use encrypted messaging over HTTP. Kerberos is more secure and is the default protocol used in a Domain environment. CredSSP is also an option but out-of-scope for this document.
HTTPS
As stated above all protocols apart from Basic use message-level encryption over a standard HTTP connection. If you wish to run WinRM over HTTPS then a certificate is required on each of the hosts that will used with WinRM.
Fortunately, Ansible uses WinRM for remote management, and has a handy PowerShell script to make this process easier.
This creates a self-signed certificate and creates the listener with the certificate. It also opens the required firewall ports.
There are also steps that are required on the assessment server, please see the Microsoft Documentation
Setting up WinRM using Group Policy
You are able to enable WinRM using Group Policy via the following steps:
Add a new GPO and then in the editor:
- Go to Computer Configuration > Policies > Administrative Templates > Windows Components > Windows Remote Management (WinRM) > WinRM Service
- Right-Click “Allow remote server management through WinRM”
- Enable and add “*” to the IP filers or add a specific IP address if required.
Next enable the service:
- Go to Computer Configuration > Policies > Preferences > Control Panel Settings
- Right-Click Services > New > Services
- Choose Automatic (Delayed Start)
- Services Name: WinRM
- Service Action: Start Service
Enable firewall rule:
- Go to Computer Configuration > Policies > Security Settings > Windows Firewall with Advanced Security.
- Right-click Inbound Rules and start a New Rule…
- Select Predefined: Windows Remote Management > Next
- Select Domain and Private, and Allow the connection
Private can be removed by editing the rule and deselecting the Private option.
Gathering Hostnames
To test connections and then to pull down the relevant information you will need first to gather all the in-scope hostnames.
Hostnames can be easily gathered by interrogating AD and exporting the names to a text file.
Get-ADComputer -filter \* | Select -Expand Name | Sort | sc \"\$home\Desktop\AD2.txt\"
Note that this does tend to include old AD entries so it is recommended to go through and remove any before proceeding as they may show as false failures later down the line.
If you don’t have access to AD or need to assess non-AD joined servers, you can build a list of IP addresses using the following:
$ping = New-Object System.Net.Networkinformation.Ping
1..10 | % {\$ping.send\(\"192.168.1.\$\_\") } | Where-Object Status -eq \"Success\" | Select-Object -Property \"Address\" | Select -Expand Address | Out-File -FilePath \"\$home\Desktop\IPaddresses2.txt\"
Change the 1..10 to the network range you wish to check as well as updating the rest of the IP address.
Note that all target servers need to answer on ICMP pings for this to work.
Testing the connections
Before moving forward with running the command to get the disk information we recommend that you first test the connections, this can be done using the following.
$credentials = Get-Credential

Test-WSMan WIN-AD-DNS -Authentication Negotiate -Credential $credential
Next, to test all the servers in the host file you can use the following
$devices = Get-Content “$home\Desktop\AD2.txt”
$creds = Get-Credentials
\$devices | ForEach-Object {
    try {
        Write-Host "Running on $_"
        Test-WSMan $_ -Authentication Negotiate -Credential $creds -ErrorAction Stop
    }
    catch {
        Write-Host "Failed"
        Write-Host ""
    }
}
Note the systems that cannot be connected (displays ‘failed’); these will need to be checked to see if they have connectivity, are still present in the environment or do not have the winrm server service running.
Starting the Sessions and getting the data
In this section, we will start sessions to all the servers that are in the hosts file then run a command that will pull the relevant data from each host.
To establish the initial connection, the following needs to be run.
$servers = Get-Content -Path “$home\Desktop\AD2.txt”
$multisession = New-PSSession -ComputerName $servers -Credential $creds -Authentication Negotiate
Note that the standard limit is 50, but this can be modified using the -ThrottleLimit flag.
Running sessions can be seen by simply entering:
$multisession
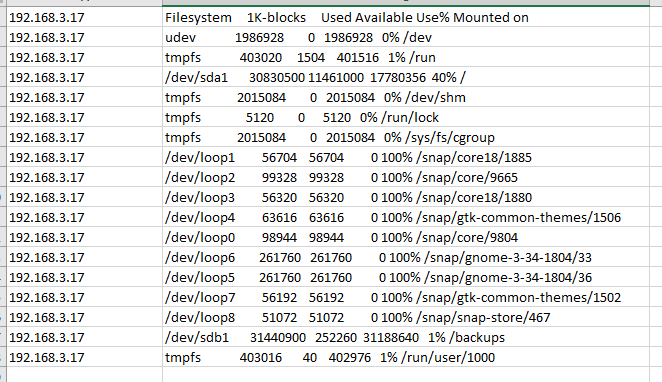
Next, we are going to run the Get-PSDrive command on each server to get the Disk Utilisation information and export it to a CSV.
Invoke-Command -Session $multisession -ScriptBlock{Get-PSDrive -PSProvider FileSystem} |Select-Object -Property Used, Free, PSComputerName, Name, Description | Export-Csv -Path "$home\Desktop\DiskInfo.csv"
Once finished ensure the connections have been closed by running:
Get-PSSession | Remove-PSSession
If this all worked correctly, you should now have a CSV file with all the server information. The open sessions to the Servers can be terminated by simply closing the PowerShell session.
Output

Linux
Before we start, it is required that all the Linux Servers to be assessed have SSH enabled either with a password, or an SSH key.
There are many ways to connect to multiple Linux machines to run; however, we have found the easiest method is to use Python. Ensure to include Python in your environmental Path (check box on install startup).
Before you start, you will need to download Python to the server that will be running the inventory.
Python will automatically install PIP to your machine, which makes it simple to import Python packages. The packages we will require for this automation Paramiko which adds SSH capabilities and XlsxWriter which can write out to excel.
In CMD type:
pip install paramiko
Also, XlsxWriter, this will allow the output to be saved to an Excel file.
pip install XlsxWriter
Using the same method as in the Windows section above to gather the IP address for all the Linux servers, you can now iterate over these using Paramiko.
Create a python file, using VS code is recommended and input the following:
Without SSH key:
import paramiko
import xlsxwriter
import logging
from pathlib import Path

# sets up error logging to a file
logging.basicConfig(filename=".\\issues.log")
logger = logger.getLogger()

username = "username" # Updated these fields with your info
password = "password"

# Python will look for the IP address file
try:
    path = Path('C:/Users/Administrator/Desktop/IPAddress.txt')  # change IP Address file location
except FileNotFoundError:
    print('Issue with file imports')

pathToExecl = Path('C:/Users/Administrator/Desktop/diskData.xlsx') # change output location
ipAdd = []
diskData = []

""" Python will loop over all addresses in text file """
with open(path, 'r') as f:
    for ip in f:
        ip = ip.rstrip()
        ssh = paramiko.SSHClient()
        ssh.set_missing_host_key_policy(paramiko.AutoAddPolicy())
        try:
            # ssh connection
            ssh.connect(hostname=ip, username=username, password=password)
        except Exception as e:
            # log errror to log file
            logger.error(e)
            print('Error connecting to server ' + ip)
            print('Check error log for details')
        else:
            # Python runs 'df' command
            cmd="df"
            # Catching the response
            stdin, stdout, stderr = ssh.exec_command(cmd)
            stdout=stdout.readlines()
            # Output to a Python list
            for item in stdout:
                ipAdd.append(ip)
                item = item.rstrip()
                diskData.append(item)
            print('Data collected for ' + ip)

"""Python export to Excel"""
if len(diskData) > 0:
    print('Writing to excel')
    # Creates workbook
    workbook = xlsxwriter.Workbook(pathToExecl)
    # Creates worksheet
    worksheet = workbook.add_worksheet()
    # Loop through all lines in the 'ipAdd' list
    for row_num, data in enumerate(ipAdd):
        worksheet.write(row_num, 0, data)
     # Loop through all lines in the 'diskData' list
    for row_num, data in enumerate(diskData):
        worksheet.write(row_num, 1, data)
    # close workbook
    workbook.close()
    print('Export finished')
else:
    print('Data was not collected')
Paramiko will look in the .ssh folder and try any keys listed there before trying the password. However, if your SSH key is not in the .ssh folder, or if you need to specify a password then you will need to specify the location manually:
import paramiko
import logging
import xlsxwriter
from pathlib import Path

logging.basicConfig(filename=".\\issues.log")
logger = logger.getLogger()

username = "username"
password = "password" # only required if SSH key requires it
try:
    path = Path('C:/Users/Administrator/Desktop/IPAddress.txt') # change IP Address file location
    keyPath = Path('C:/Users/Administrator/.ssh/id_rsa') # change ssh key location
except FileNotFoundError:
    print('Issue with file imports')

key = paramiko.RSAKey.from_private_key_file(keyPath) # Comment out this and uncomment the below if a SSH password is in use
# key = paramiko.RSAKey.from_private_key_file(keyPath, password)
pathToExecl = Path('C:/Users/Administrator/Desktop/diskData.xlsx') # change excel output location
ipAdd = []
diskData = []

with open(path, 'r') as f:
    for ip in f:
        ip = ip.rstrip()
        ssh = paramiko.SSHClient()
        ssh.set_missing_host_key_policy(paramiko.AutoAddPolicy())
        try:
            ssh.connect(hostname=ip, username=username, pkey = key)
        except Exception as e:
            logger.error(e)
            print('Error connecting to server ' + ip)
            print('Check error log for details')
        else:
            cmd="df"
            stdin, stdout, stderr = ssh.exec_command(cmd)
            stdout=stdout.readlines()
            for item in stdout:
                ipAdd.append(ip)
                item = item.rstrip()
                diskData.append(item)
            print('Data collected for ' + ip)

if len(diskData) > 0:
    print('Writing to excel')
    workbook = xlsxwriter.Workbook(pathToExecl)
    worksheet = workbook.add_worksheet()
    for row_num, data in enumerate(ipAdd):
        worksheet.write(row_num, 0, data)
    for row_num, data in enumerate(diskData):
        worksheet.write(row_num, 1, data)
    workbook.close()
    print('Export finished')
else:
    print('Data was not collected')
Note: this code is provided without warranty, please check referenced resources before using. If you have any issues when running the code please check the log file that is created when you ran the code (issues.log).
The Python file can run directly in VSCode via the ‘play’ button in the top right or via PowerShell via:
python nameofscript.py
Output
Setting up an SSH Key
To set up your SSH key locally you will need OpenSSH, if you are using Windows 10 or WS2019 you can follow these installation steps.
If you are on WS2016 or earlier you can install OpenSSH via Git Bash available from Git.
With W10 & W2019 run the following in PowerShell, on other systems run Git Bash.
ssh-keygen
Generating public/private rsa key pair.
Enter file in which to save the key (/your_home/.ssh/id_rsa):
Unless you wish to change the location click next.
Enter passphrase (empty for no passphrase):
Enter a password if required, this will then create the keys.
If your Linux distribution supports
ssh-copy-id
You will be able to easily copy the key to the system, this will require the target server to be accessible by a password.
ssh-copy-id -i ~/.ssh/mykey user@host
If not you will need to manually add the public key to the target host’s authorized keys file.
Once completed you will find the resulting Excel file will be in the location where you specified in the script.
References
- Set Up of WinRM
- SSH Remoting with PowerShell
- New-PSSession: PowerShell
- Add AD Admin to Windows 10
- Python
- Paramiko
- Xlsxwriter