Veeam Backup & Replication Security Best Practice Guide
WORM Storage with Veeam Hardened Repository
Veeam Hardened Repository is a WORM storage solution that protects against unwanted changes to the backup files. It’s available since version 11, based on Linux and uses built-in xattr capabilities to set files immutability.
Veeam Hardened Repository passed an external audit for WORM storage and meets highest compliance standards.
DISA STIG profile enabled operating systems are eligible since version 12.1.2 (build 12.1.2.172). Read helpcenter [here] (https://helpcenter.veeam.com/docs/backup/vsphere/hardened_repository_limitations.html?ver=120#linux-server)
For general information on the Hardened Repository on Linux, please refer to the the user guide.
Note: Future releases of Veeam Backup and Replication will include stripped-down Linux versions for VBR Server, Proxies and Repositories that will be based on JeOS and that will update and patch automatically.
Veeam Hardened Repository ISO
In general, it is not recommended to use the new Veeam Hardened Repository ISO at this point as it still is under experimental support. You will get support but there is no commitment on SLAs.
This ISO will require you to have a minimum of 2 preconfigured, local disks of 100GB+:
- The smallest disk, typically a RAID 1 on flash storage devices, is used for the OS
- All other disks are pooled together in a single LVM volume group. Typically, mechanical drives.
It is important that the RAID setup and volume configuration is done before you start installation.
Note: disks should be local, iSCSI/FC are not supported.
External Factors
Although the ISO does a great job at hardening the repository at a software level, there might be factors that might limit the security of your setup external to the software. Most notably:
- Physical access: If somebody has physical access to your system, it could still be compromised. This could include locking your rack.
- Out-of-band management such as Dell DRAC, HPE iLO, IBM IMM etc.: Secure the access via Firewall tools or use tools such as MFA to harden the access. If your out-of-band management is compromised, a malicious actor could overwrite the current system. However Out-of-band management can be useful to detect broken hardware such as disk failure. In this case, you could also opt to only allow outgoing traffic such as SMTP/SNMP so you get notified when an issue occurs. Additional, if your Out-of-band management supports multiple roles with RBAC functionality, you could configure users that only have Remote Access without the capability to mount remote media.
- Keep your complete Veeam Data Platform up-to-date
- You might want to consider setting up a grub password so booting into single user mode might be more difficult. However, if an attacker is able to get to the grub screen, it probably means you have already been compromised on a physical access level (or out-of-band management level).
Manual Setting up Rocky Linux
Although using the Veeam Hardened Repository ISO provided by Veeam is a fast and convenient way, there might be scenario’s where you want to alter the installation or you want more configuration options. It is still supported to install Rocky or Redhat manually and optimize it for your environment. You can also use Ubuntu or SUSE but Rocky Linux has the advantage that is is free, it has security profiles built-in and that it will be used and validated by all customers using the Veeam provided ISO.
Common use case could be
- As long as the ISO is under experimental support, it might make sense to manually install a hardened repository.
- You want to use externally connected storage such as FC or iSCSI.
- You want to install a management agent for monitoring.
- You have multiple repositories and you want to manual configure yum repository mirrors.
- You have a limited list of supported operating systems or you want to make sure the system is officially supported by your underlying hardware vendor
- You have a security policy requirement different from DISA STIG (although DISA STIG is the only validated and officially supported policy).
- You want to create your own automated install.
- You have Linux expertise and you want to optimize the partitioning yourself. Eg, you want to implement LVM yourself by using features such as striping. You could also consider ZFS although at this point ZFS is in experimental support and at the time of writing, users are reporting issues when synthetic fulls are created. The recommendations remains to use XFS.
- You want to have full control over updates
| ‼️ Warning |
|---|
| Do keep in mind that some of these reasons could create additional attack vectors and are the reasons why they are not supported in the first place. For example, if you use iSCSI but your iSCSI network gets compromised, your backups might be impacted. Take great care when considering them. |
Recomendations on manually setting up Rocky Linux
| ‼️ Warning |
|---|
| We will not discuss the complete setup here. Eg how to format the data volumes with reflink support is part of the official helpcenter. The documentation here is added as complementary information. |
During Installation
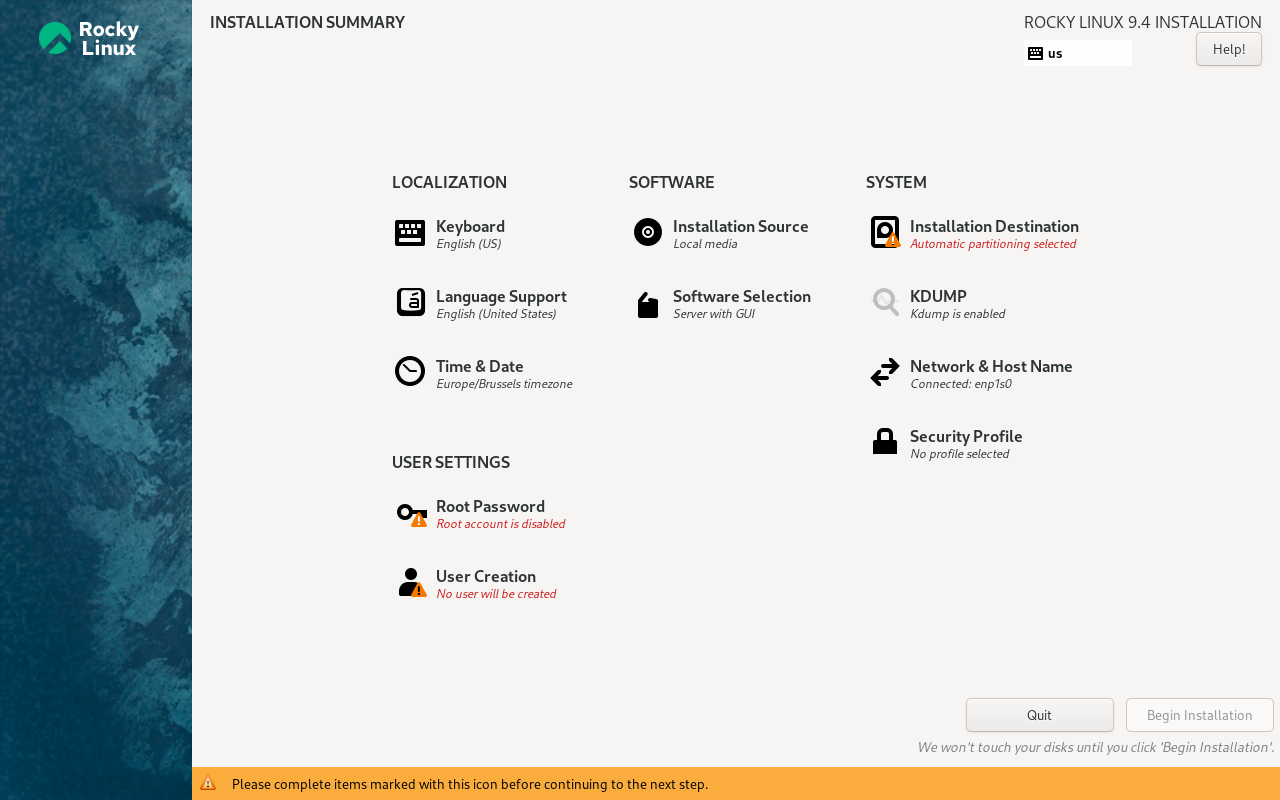
When you install RHEL or Rocky Linux manually, you can select the DISA STIG profile during installation. You will find it in the System section

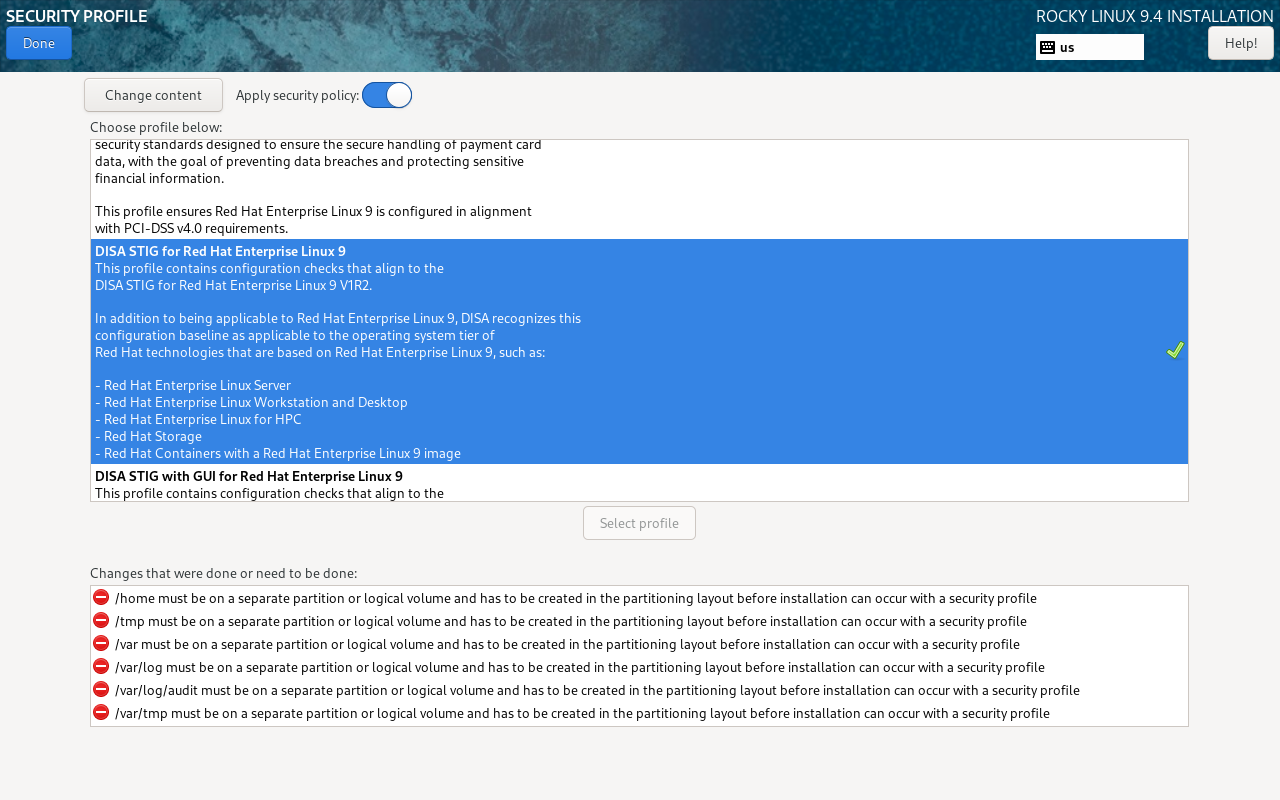
Once you have selected the Security Profile. You will potentially get some warnings about partitioning

In order to comply with the DISA STIG security policy you need to configure the required partitions. We recommend to have an OS disk of minimum 100GB (eg 2 flash drives in RAID 10). On this physical disk you can create 3 partitions.
- /boot
- /boot/efi
- pv systemvol
The systemvol you can use to create an LVM volume group (thus containing only one physical volume). All other partitions listed below can be defined as logical volumes on the system vol.
| Partition | Min Size | Max Size |
|---|---|---|
| /boot | 1GB | 5GB |
| /boot/efi | 0.2GB | 1GB |
| / | 13GB | 20GB |
| /home | 24GB | Infinite * |
| /var | 7GB | 15GB |
| /var/log | 24GB | 100GB |
| /var/log/audit | 3GB | 5GB |
| /var/tmp | 1GB | 3GB |
| /tmp | 24GB | Infinite * |
| SWAP | 2GB | 3GB |
* Infinite means that you should divide the remaining space between these logical volumes. Eg, if you have 480GB drive, the other partions will take 152GB, that means there is a remaining capacity of 480-152=328GB, or 328GB/2 = 164GB for /home and 164GB for /tmp. /home and /tmp are used for temporary- and caching files for certain Veeam processes. Refer to KB4283 for more information.
For all other physical disks, they can be cleared and added as a physical volume to a volume group called datavol. From this datavol, you could create a logical volume that you can mount under /mnt. Please refer to the helpcenter. It is always a good idea to create a subfolder in the volume eg. /mnt/backups/repository01. When you add the repository to Veeam Backup & Replication, select this subfolder as a base for your backups.
Here is a list of required packages for a minimal Rocky Installation in DISA STIG mode that supports a Hardened Repository. It includes dnf-automatic which strictly speaking is not required but strongly recommended, see section below.
%packages
@core
## Needed by DISA STIG
aide
audit
chrony
crypto-policies
dnf-automatic
fapolicyd
firewalld
gnutls-utils
libreswan
opensc
openscap
openscap-scanner
openssh-clients
openssh-server
openssl-pkcs11
pcsc-lite
policycoreutils
policycoreutils-python-utils
rng-tools
rsyslog
rsyslog-gnutls
scap-security-guide
subscription-manager
sudo
tmux
usbguard
-gdm
-iprutils
-nfs-utils
-quagga
-sendmail
-telnet-server
-tftp-server
-tuned
-vsftpd
-xorg-x11-server-Xorg
-xorg-x11-server-Xwayland
-xorg-x11-server-common
-xorg-x11-server-utils
## END of DISA STIG PKGs
dracut-live
efibootmgr
grub2-common
grub2-tools-minimal
grub2-tools
grubby
grub2-efi
libblockdev-nvme
libnvme
nvme-cli
shim-x64
sos
xfsdump
xfsprogs
User Accounts
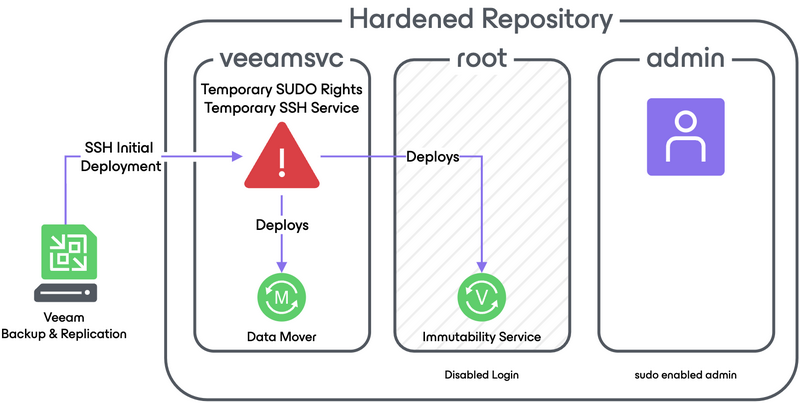
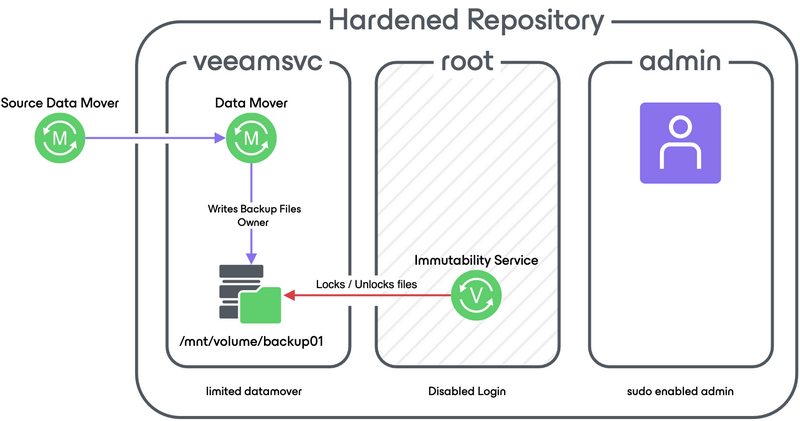
A hardened repository is typically implemented using 3 users
- Root account: This account should not be used for human interaction. In fact it should be locked during installation as required by the DISA STIG Profile.
- Admin account: In the hardened repository, this account is used for human interaction. Recommended is to choose another name than admin, although the password requirement for DISA STIG are demanding enough to make it secure. You should also consider MFA or key-based authentication over SSH to harden this account.
- Service Account: This account should have very limited access, in fact, it should only be able to write to the repository (directory holding the backups). The Veeam Data Mover will run under this account. You could pick for example veeamsvc as an account. Please refer to the helpcenter on how to set this account as the owner of the repository and restrict other users from accesing the backup files.
Initially the Veeam Service account should have temporary SUDO rights to deploy the service. The initial deployment is done over SSH but again, it is strongly recommended to disable SSH after the initial setup is done.

The SUDO rights can be fined tuned to only install the Veeam services. Refer to KB4667 to get a complete a list if you want to use another distribution such as SUSE. For example, zypper is a package manager for SUSE and thus you do not need SUDO rights for it if you are using Rocky Linux.
# /etc/sudoers.d/veeamsvc

veeamsvc ALL = (ALL) /bin/whoami, \
                          /bin/uname, \
                          /bin/ls, \
                          /bin/find /opt/veeam/deployment -type d, \
                          /bin/find /opt/veeam/deployment -type f -not -path /opt/veeam/deployment/veeamdeploymentsvc, \
                          /opt/veeam/deployment/veeamdeploymentsvc, \
                          /opt/veeam/transport/veeamtransport, \
                          /opt/veeam/transport/veeamtransport-link, \
                          /bin/test, \
                          /bin/yum --assumeyes --errorlevel=0 install /tmp/*, \
                          /bin/chown -hR root /opt/veeam/deployment, \
                          /opt/veeam/deployment/veeamdeploymentsvc, \
                          /opt/veeam/transport/veeamtransport, \
                          /bin/chmod 755 /opt/veeam/, \
                          /bin/chmod 755 /opt/veeam/deployment, \
                          /bin/chmod 755 /opt/veeam/deployment/ca-trusted, \
                          /bin/chmod 755 /opt/veeam/deployment/scripts, \
                          /bin/chmod 644 /opt/veeam/deployment/ca-trusted/DigiCertTrustedG4CodeSigningRSA4096SHA3842021CA1.crt.pem, \
                          /bin/chmod 644 /opt/veeam/deployment/ca-trusted/DigiCertTrustedRootG4.crt.pem, \
                          /bin/chmod 644 /opt/veeam/deployment/libVeeamDeploymentDll.so, \
                          /bin/chmod 644 /opt/veeam/deployment/scripts/veeamdeployment, \
                          /bin/chmod 644 /opt/veeam/deployment/scripts/veeamdeployment.service, \
                          /bin/chmod 644 /opt/veeam/deployment/VeeamDeploymentConfig, \
                          /bin/chmod 744 /opt/veeam/deployment/veeamdeploymentsvc, \
                          /opt/veeam/transport/veeamtransport-link --set-user veeamsvc, \
                          /bin/yum --assumeyes --errorlevel=0 remove veeamdeployment, \
                          /bin/yum --assumeyes --errorlevel=0 --disablerepo=* install /tmp/*, \
                          /bin/rm -rf /opt/veeam/deployment

| ‼️ Warning |
|---|
| It is crucial to permanently disable SSH and remove SUDO right for the veeamsvc account at this point |
In the Veeam Hardened Repository ISO, the vhradmin is not actually an admin. It’s login prompt is replaced with a tool call /usr/sbin/veeam-repo-config in /etc/passwd. This tool has SetUID rights meaning that it works similar like SUDO rights. The user can do admin tasks but only limited to the capability tasks such as setting up the network, running updates, starting ssh manually. Since the tool is set as the logon prompt, whenever the user exists, the user is logged and this does confine the user much more then a traditional SUDO setup
You could do something similar with limited SUDO rights by creating a daily user that can just execute basic SUDO commands. This means you restrict the usage of the regular admin user and share this account with for example an operation admin
Create a daily user
useradd -m daily
passwd daily
The following setup would allow the daily user to execute yum update to do daily updates and run the nmtui tool to configure the network.
# /etc/sudoers.d/daily
daily ALL = (ALL) /bin/yum update, /bin/nmtui
This is very specific, eg running yum update -y will not be allowed
[daily@localhost ~]$ SUDO yum update -y
[sudo] password for daily:
Sorry, user daily is not allowed to execute '/bin/yum update -y' as root on localhost.localdomain.
Firewall
You can use Firewalld (default) to setup a simple but secure firewall. This configuration will drop all incoming packages except for ssh and dhcpv6 services
Create /etc/firewalld/zones/drop.xml
<?xml version="1.0" encoding="utf-8"?>
<zone target="DROP">
  <short>Drop</short>
  <description>Unsolicited incoming network packets are dropped. Incoming packets that are related to outgoing network connections are accepted. Outgoing network connections are allowed.</description>
  <service name="ssh"/>
  <service name="dhcpv6-client"/>
  <forward/>
</zone>
In the /etc/firewalld/firewalld.conf the drop zone should be set as the default
DefaultZone=drop
The biggest difference between the default config is that
- It will explicitly drop all unknown incoming connection that do not match any of the rules
- It does not allow cockpit (remote management)
If you are not using dhcpv6-client (IPv6) you can consider also removing this service. If you have already added the server to VBR, you could choose to remove the SSH service here as well so that everything is blocked. By default, the Veeam environment service will dynamically open ports.
Automatic updates
The dnf-automatic package can be installed to update the system in automated way without interaction. If you will not be able to update this server on a regular interval, it is strongly recommended to implement it and at least have security updates installed.
By default in /etc/dnf/automatic.conf you will see that the upgrade type is default (which means all available updates) and that updates will be automatically downloaded and applied. Do keep in mind that the default is not to reboot
The following config can be used in /etc/systemd/system/dnf-automatic.timer.d/override.conf to run dnf-automatic automatically
[Unit]
Description=dnf-automatic timer
ConditionPathExists=!/run/ostree-booted
Wants=network-online.target

[Timer]
OnCalendar=
OnCalendar=Mon *-*-* 8:00
RandomizedDelaySec=60m
Persistent=true

[Install]
WantedBy=timers.target
This effectively runs dnf-automatic every Monday at 8:00am with a random delay of 60m avoiding multiple server to update at the exact same time. This makes a lot of sense for a backup repository as during the night, such repositories are busy receiving backup data. In any case, the recommendation would be to schedule it outside the backup window so you do not get unexpected reboots.
Time / Chrony set up
You might consider setting up nts service to make sure you have a more secure setup.
Since v12, the Veeam Hardened Repository has protection against large timeshifts.
A second advised and interesting option is to use a DCF77 (or locally equivalent) dongle with XNTP package to synchronize the repository on long wave signal.
In any case, Veeam Backup & Replication will detect timeshifting, block retention operations and raise a warning on the job status that should extensively be monitored.


