Veeam Backup & Replication Best Practice Guide
VM Restore
This section provides a step-by-step description of a full virtual machine restore process implemented in Veeam Backup & Replication.
1. Initialization Phase
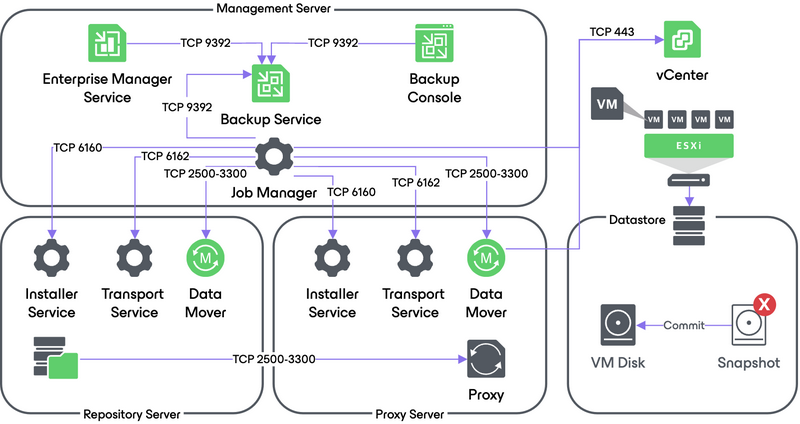
In the initialization phase, Veeam Backup & Replication prepares the resources necessary for full VM recovery. It performs the following steps:
- Starts the necessary processes on the Veeam Backup Server.
- Checks available backup infrastructure resources and assigns a proxy server for transferring restored VM data to the target host/datastore.
- Communicates with Transport Services on the backup proxy and backup repository where the backup files reside. Transport Services, in their turn, start Veeam Data Movers. Veeam Data Movers on the backup proxy and repository establish a connection with each other for data transfer.
- Connects to the vCenter Server or ESXi host where the restored VM will be registered.
2. Restoring VM Configuration
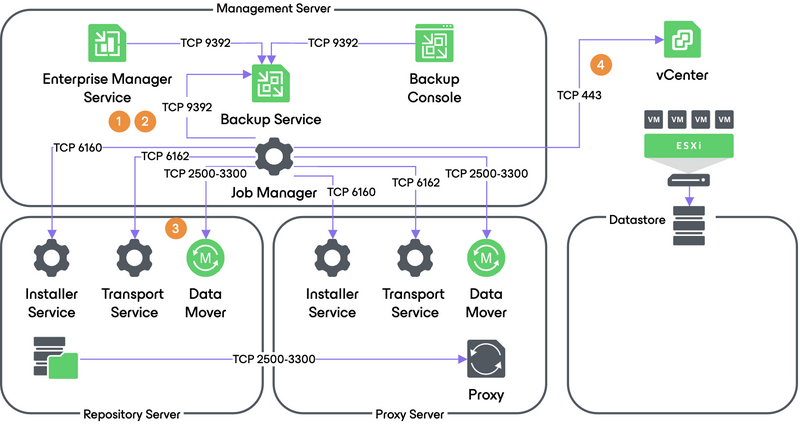
Veeam Backup & Replication retrieves VM configuration data from the backup and restores it on the chosen ESXi host/datastore. Next, it instructs VMware vSphere to register the restored VM on the host. If a user selects to change VM configuration (for example, disk format or network settings) during restore, Veeam makes the necessary amendments.
3. Creating VM Snapshot
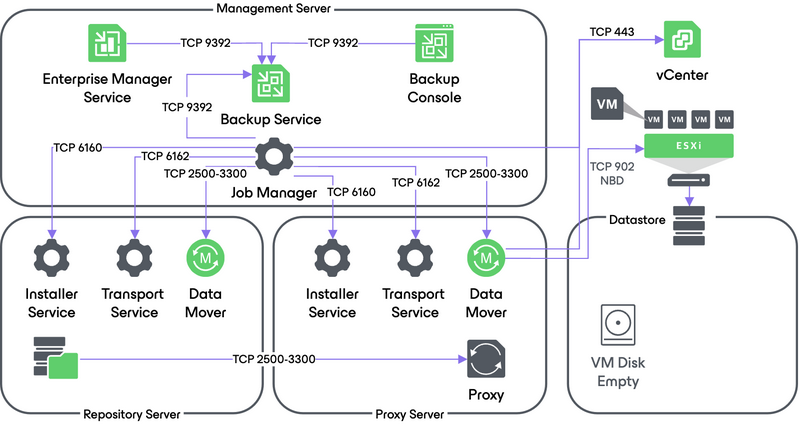
Veeam Backup & Replication requests the vCenter Server or ESXi host to initiate a VM snapshot creation on the restored VM.
4. VM Data Transport
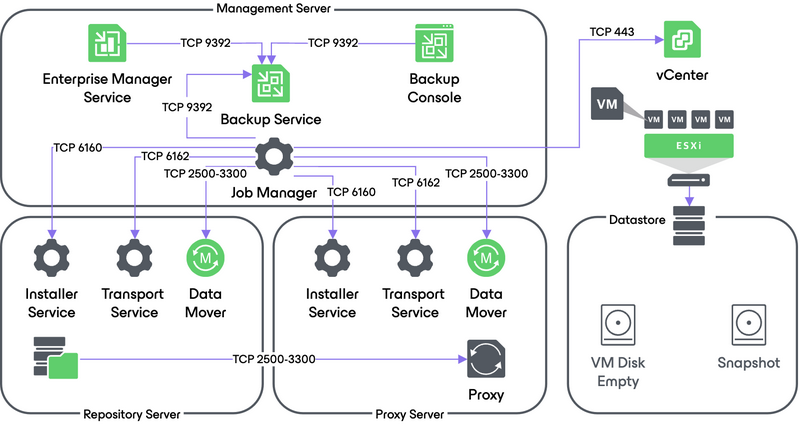
Veeam Backup Manager instructs VMware vSphere to create virtual disks for the VM.
To write VM disk data to the target datastore, Veeam Backup & Replication can use one of the 3 transport modes provided by vSphere:
- Direct Storage Access
- Virtual Applicance (HotAdd)
- Network (NBD)
For more information about each transport mode, see Veeam Transport Modes in the user guide and the corresponding section of this document. In addition to these modes, Veeam Backup & Replication lets you restore VM data directly from native storage snapshots using Storage System Snapshot Integration.
4a. Direct Storage Access Data Transport Mode
This mode is not available for VMs that have at least one thin provisionned disk.
In the Direct Storage Access mode, Veeam Backup & Replication connects to the ESXi host where the restored VM is registered. The ESXi host locates the VM disks, retrieves metadata about the disk layout on the storage, and sends this metadata to the backup proxy. The backup proxy uses this metadata to copy VM data blocks to the datastore via SAN/NAS corresponding protocol.
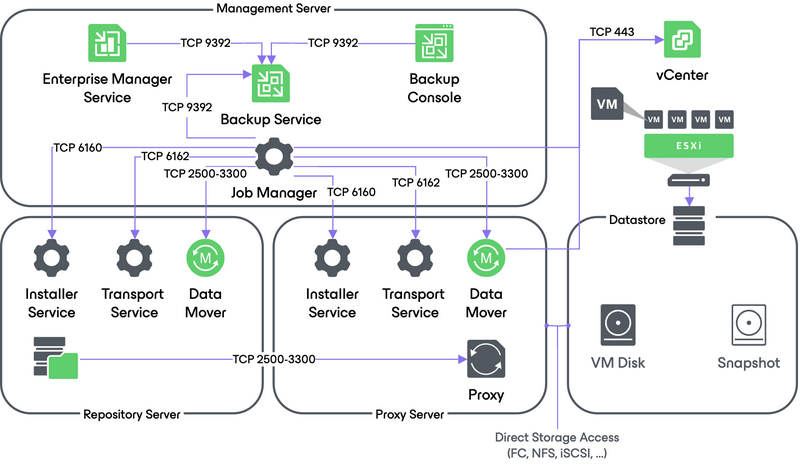
For SAN restores, the proxy must have write access to the LUN(s) used to build the destination Datastore NAS restores use the proxy’s NFS client.
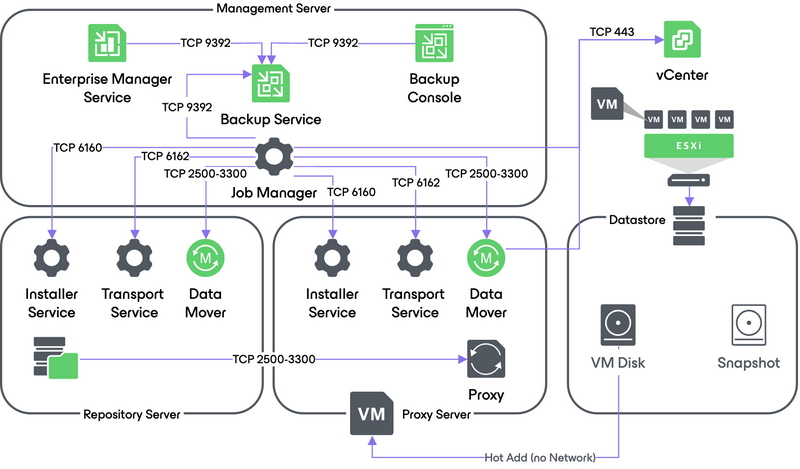
4b. Virtual Appliance Data Transport Mode
In the Virtual Appliance transport mode, VM disks from the backup are hot-added to a virtualized Veeam backup proxy. The proxy connects to the ESXi host where the restored VM resides and transfers disk data to the target datastore through the ESXi vSCSI stack. When the data transfer process is finished, disks are unmapped from the backup proxy.
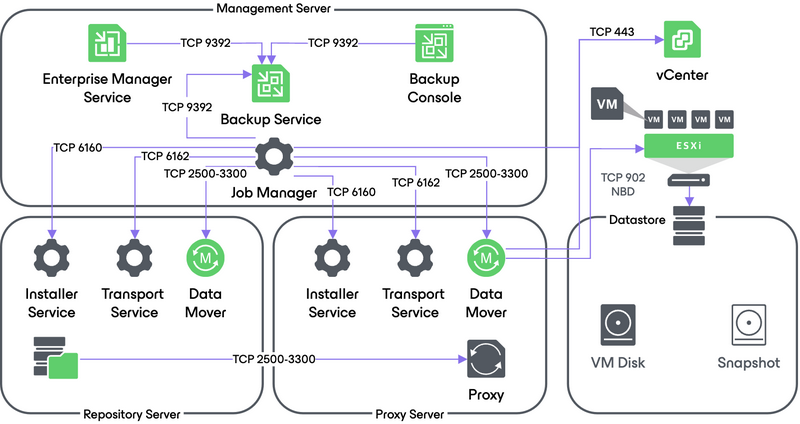
4c. Network Data Transport Mode
In the Network transport mode, Veeam backup proxy connects to the ESXi host where the restored VM resides, and writes VM disk data to the target datastore using NFC over TCP port 902 through the LAN channel.
5. Committing VM Snapshot
After the proxy finishes writing VM disk data, Veeam Backup & Replication requests the vCenter Server or ESXi host to initiate a snapshot commit for the restored VM.
