Veeam Backup & Replication Best Practice Guide
VMware Backup
This section provides a step-by-step description of a VMware virtual machine backup process implemented in Veeam Backup & Replication.
1. Initialization Phase
A backup job can be started automatically or manually in the Veeam Backup & Replication console, Veeam Backup Enterprise Manager web console, by means of PowerShell, RESTful API and other.
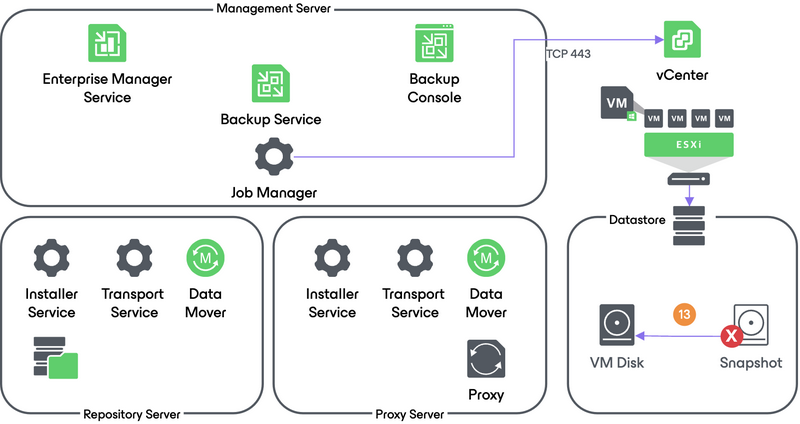
In the initialization phase, Veeam Backup & Replication prepares resources necessary for a backup job. To help you better understand firewall settings and connection initiation flow, the process is illustrated by the diagram (see below):
- When a backup job is initialized, the Veeam Backup Manager process is started on the Veeam backup server.
- Veeam Backup Manager reads job settings from the Veeam Backup configuration database and creates a list of VM tasks to process (one task stands for one VM disk).
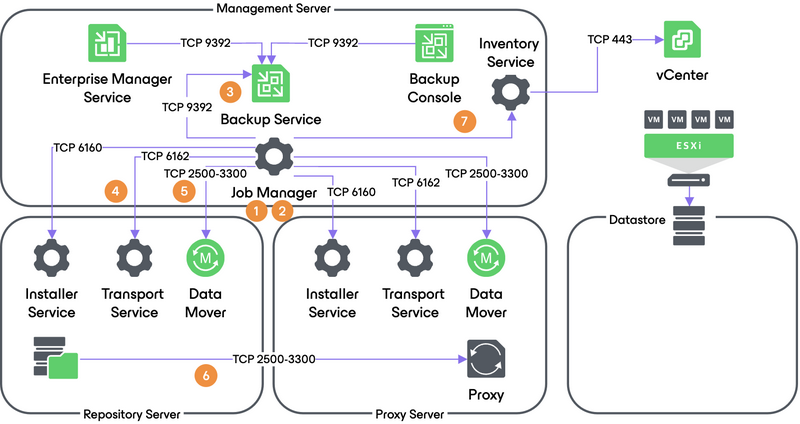
- Veeam Backup Manager connects to the Veeam Backup Service. The Veeam Backup Service includes a resource scheduling component for managing all tasks and resources in the backup infrastructure. The resource scheduler checks what resources are available, and assigns backup proxies and repositories to process that job tasks using Veeam’s load balancing.
- After the necessary backup infrastructure resources have been assigned, Veeam Backup Manager connects to the Transport Services on the target repository and on the backup proxy. The Transport Services, in their turn, start the Veeam Data Movers. On the backup proxy, a new Veeam Data Mover is started for each task that the proxy is processing.
- Veeam Backup Manager establishes a connection with Veeam Data Movers on the backup repository and backup proxy, and sets a number of rules for data transfer (such as network traffic throttling rules, and so on).
- Veeam Data Movers on the backup proxy and repository establish a connection with each other for data transfer.
- Veeam Backup Manager connects to the vCenter Server or ESXi host and gathers metadata about VMs and hosts engaged in the backup process. At this step, no connection between the Veeam backup server and VM guest networks is established.
2a. Guest Processing for Windows-Based VMs
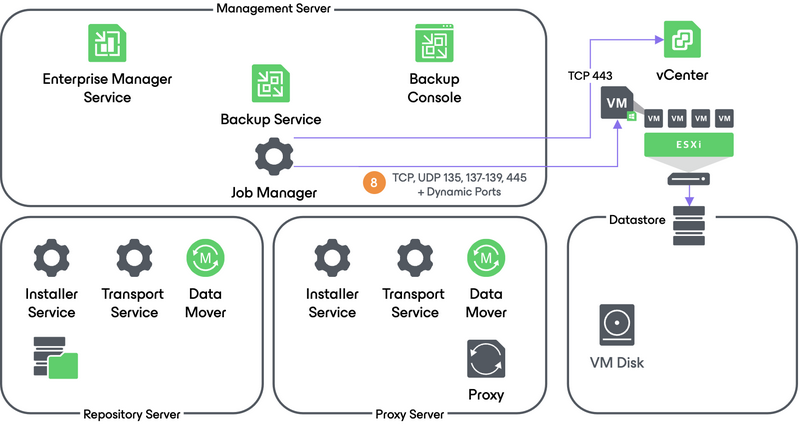
- For VMs with Microsoft Windows guest OS, Veeam Backup & Replication obtains information about the guest’s IP addresses from VMware Tools. Veeam uses these IP addresses to connect to the guest OS and perform in-guest processing tasks (if application-aware image processing is enabled).
If it is not possible to connect to the guest OS or the connection is blocked by a firewall, Veeam Backup & Replication tries to establish a connection using VIX, as described in section 2b.
2b. Guest Processing for Windows-Based VMs (VIX)
- If there is no network connectivity to the VM guest OS, Veeam Backup & Replication uses the communication channel provided by VMware Tools (VIX) to interact with the guest OS and perform in-guest processing tasks.

2c. Guest Processing for Linux/Unix-Based VMs
If pre-freeze and post-thaw scripts are enabled in the backup job properties, Veeam Backup & Replication obtains information about the guest’s IP address from VMware Tools. Veeam uses this IP address to connect to the guest network over SSH and perform in-guest processing tasks. Scripts reside on the backup server and are injected in the guest OS at the time of backup.
If there is no network connectivity with a Linux-based VM, Veeam Backup & Replication v10 now supports VIX processing for Linux OS’s too and will failover to this method.
One thing to keep in mind is that Pre-freeze and post-thaw scripts for Linux do not perform elevation to root (sudo) when networkless processing (VIX) is used.
3. Creating a VM Snapshot
- Now, Veeam Backup & Replication requests the vCenter Server or ESXi host to initiate a VM snapshot creation. A VM snapshot is required to use VMware VADP backup methods and leverages features like VMware Changed Block Tracking (CBT).
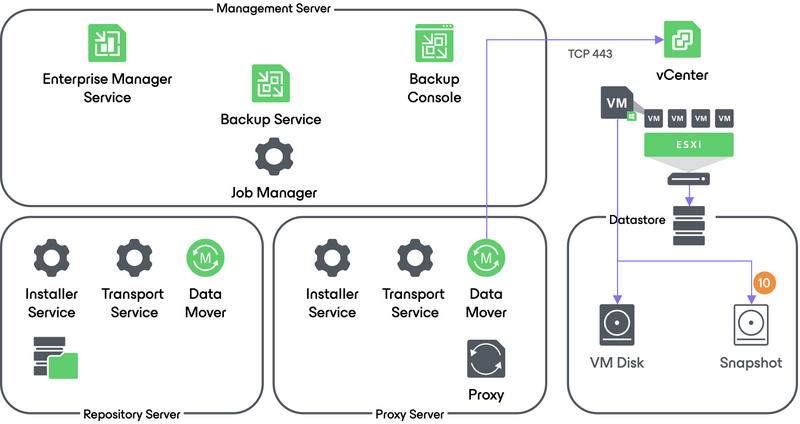
4. Releasing the Guest OS Activities
Right after the VM snapshot is taken, all quiesced disk I/O activities in the guest OS are resumed.
5. VM Data Transport
To read and transfer data from the VM snapshot, Veeam Backup & Replication can use one of the following transport modes:
- Direct SAN Access
- Virtual Appliance (HotAdd)
- Network (NBD)
For more information about each transport mode, see Transport Modes section of the Veeam Backup & Replication User Guide, or a corresponding section on this site.
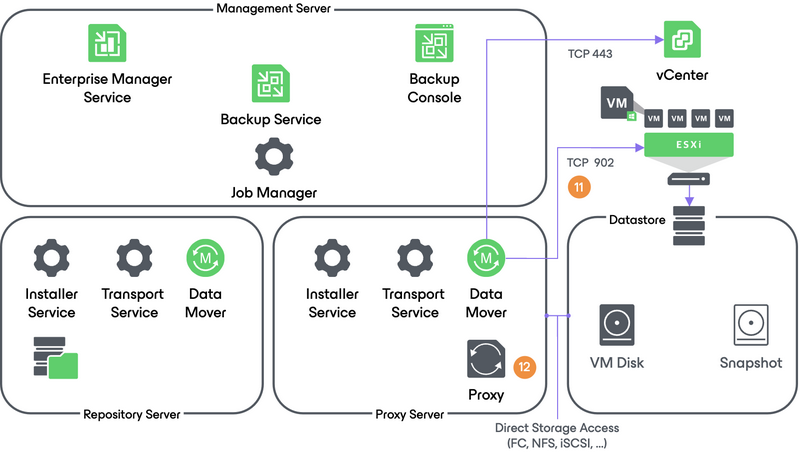
5a. Direct Storage Access Data Transport Mode
- In the Direct Storage Access mode, Veeam backup proxy connects to the ESXi host where the VM resides, and reads the necessary VM configuration files (such as *.vmx) using NFC over port 902.
- Backup proxies use VM configuration details to read VM data directly from the SAN/NAS Datastore.
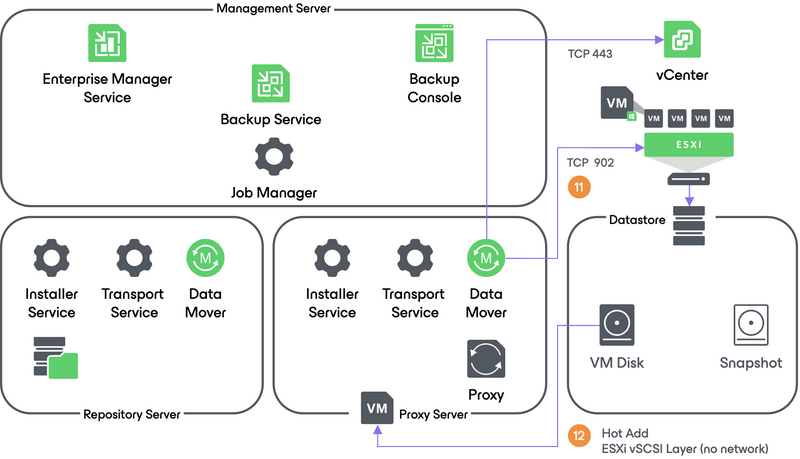
5b. Virtual Appliance Data Transport Mode
- In the Virtual Appliance transport mode, Veeam backup proxy connects to the ESXi host where the VM resides, and reads the necessary VM configuration files (such as *.vmx) using NFC over port 902.
- VM disks as of the snapshot state are hot-added to a virtualized Veeam backup proxy. The proxy reads VM data through ESXi vSCSI stack and unmaps the VM disks when finished.
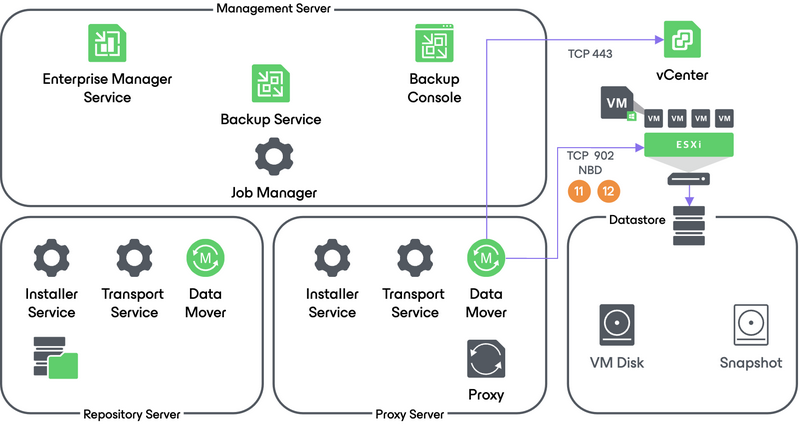
5c. Network Data Transport Mode
- In the Network transport mode, Veeam backup proxy connects to the ESXi host where the VM resides, and reads the necessary VM configuration files (such as *.vmx) using NFC over port 902.
- The same data channel is used to read VM disk data, too.
6. Committing VM Snapshot
- After Veeam backup proxy finishes reading VM data, Veeam backup server requests the vCenter Server or ESXi host to initiate a VM snapshot commit.