


Veeam Service Providers Best Practice Site
Convert MSSQL standalone to Always On
In many cases we start small and at some point we want to scale the deployment of SQL Server. In this case we can leverage the Windows Server Failover Cluster technology combined with SQL Server Always On. Thanks to this, we can make our database backend fully redundant. We create one or more extra SQL Server(s) and then we join the existing and the new one(s) as members of the cluster.
In the following example, we will show the steps needed to go from a SQL Server standalone to SQL Server AlwaysOn Availability Group. Obviously, there are many other possible design choices, depending on your requirements, infrastructure, SQL knowledge, licensing costs etc. Ultimately, the application service needs to connect to a Microsoft SQL database regardless of how it is set up in the backend.
The supported versions for MS SQL Server AlwaysOn are 2016, 2017 and 2019.
In our example we used SQL Server 2019.
-
Prerequisites:
- 2 Windows Server to install MSSQL Server onto
- MSSQL Server installation media and license
- 3 IP addresses: one for each node and one to serve as virtual IP for the cluster
- Active Directory deployed and configured
- DNS deployed and configured
- DNS names for each of the SQL Server nodes and the SQL Listener
- 1 Service Account to be used on each node in the SQL cluster. It is recommended to use a gMSA (Group Managed Service Account), but a regular Service Account works as well.
- More details available at Microsoft Docs
-
Install the Failover Clustering feature onto both servers.
-
Open Failover Cluster Manager -> Validate Configuration. Add all SQL servers to validate them at once.
Click Next and run all tests. There may be some warnings, but the overall result should be Validated for both nodes.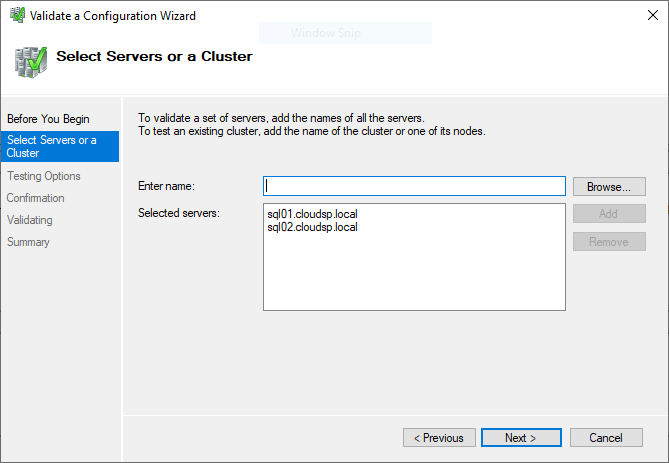
-
Choose the option Create the cluster now using the validated nodes to start the new Create Cluster Wizard.
-
Provide a Cluster Name and IP address and click Next to proceed:
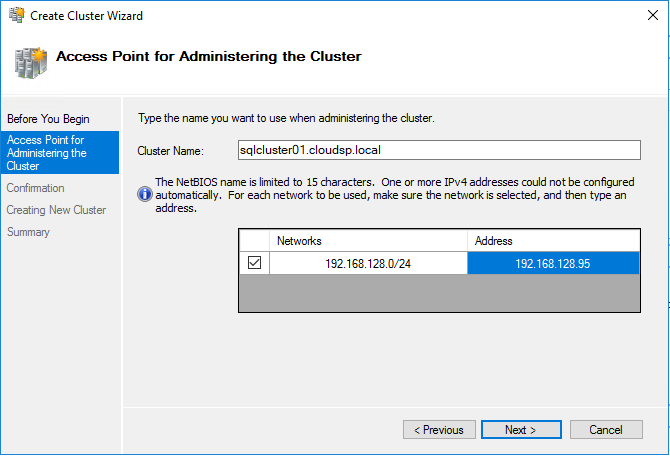
Once the wizard is completed, the cluster is up and running, and we can already ping the Cluster Name FQDN, in this example called sqlcluster01.cloudsp.local.
-
Right click on the cluster -> More Actions -> Configure Cluster Quorum Settings. Choose one of the options and complete the configuration.
-
Create a new Security Group and add the Windows Servers to it. Then create a new gMSA or regular service account for SQL Server. This account will be used to execute the service on both cluster nodes. In this example we will create a Security Group called SQL_Servers, add the SQL servers to it and create the gMSA called gMSA_SQL.
New-ADGroup -Name 'SQL_Servers' `
            -GroupCategory Security `
            -GroupScope DomainLocal `
            -Description 'SQL Servers'

Add-ADGroupMember -Identity 'SQL_Servers' `
                  -Members 'sql01$','sql02$'

New-ADServiceAccount -Name 'gMSA_SQL' `
                     -Description 'SQL AlwaysOn' `
                     -DNSHostName 'gMSA_sqlcluster01.cloudsp.local' `
                     -ManagedPasswordIntervalInDays 30 `
                     -PrincipalsAllowedToRetrieveManagedPassword 'SQL_Servers' `
                     -Enabled $True `
                     -PassThru
Once created we can see the new gMSA under Active Directory Users and Computers -> Managed Service Accounts:

-
Log on to the SQL Server that was used for the initial deployment (in this example SQL01) and edit the SQL Server properties. Go to the Log On tab and browse to change the settings to the gMSA from the previous step. Make sure that the Password fields are empty before clicking Apply:
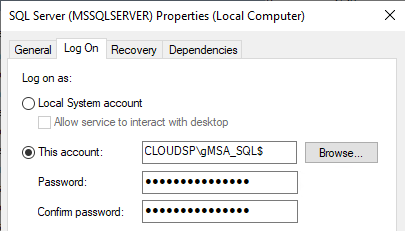
You will receive a notification that the service has been granted Log On rights and another one that the service needs to be restarted for the new logon name to take effect. We will restart at a later step.
-
On SQL Cluster node 2 (in this example SQL02), run a new installation of a standalone SQL Server.
During setup, the options you need to care about are:- Instance root directory: Set this to a dedicated disk (in this example E:)
- Instance name (in this example SQL02)
- SQL Server Database Engine: Set the service account from Step 7
-
On each node open SQL Server Configuration Manager -> SQL Server Services -> SQL Server -> Properties. Open the tab named Always On Availability Groups, check the box to enable the feature and click OK to save. Restart the SQL Server service to apply the new configuration.
If you receive an error message that says that the service did not start due to a logon failure while using gMSA it means that the machine is not allowed to retrieve the latest password from the domain controller. (This setting is called “PrincipalsAllowedToRetrieveManagedPassword” as mentioned in Step 6.) When this is just created, it can take some time for the policy to propagate. To speed up the process you can force an update via gpupdate /force or restart the machine. Afterwards, the service can start and we can proceed with the next step.
-
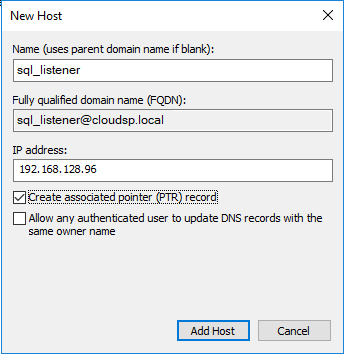
Create a DNS record on your local DNS Server for the SQL Listener. This is the virtual name that will be used to publish the Availability Group:
-
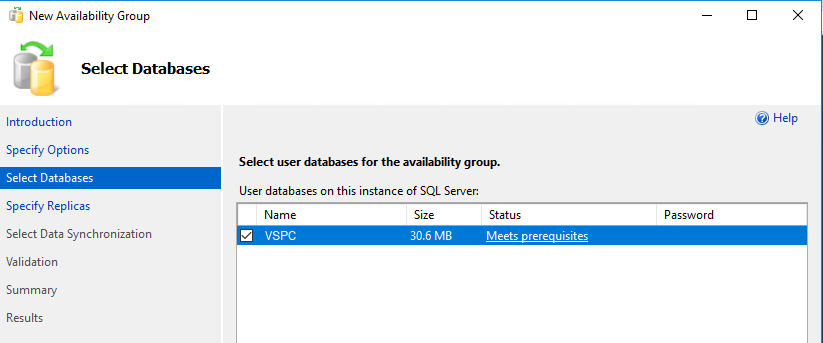
In SQL Server Management Studio, verify that the database has Full as its recovery model, and that at least one backup has been completed.
-
In SQL Server Management Studio, right click on Always On High Availability and start the wizard to create a New Availability Group. In this example we will call it VSPC. At this point our database should meet all the prerequisites:
-
At Specify Replicas, add both nodes to the list of Replicas and enable Automatic Failover for both.
-
Open the Endpoints tab and verify that SQL Server service account is the same for both.
-
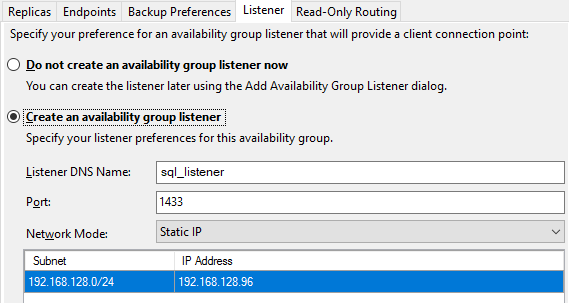
Open the Listener tab and set the Listener DNS Name that was created at step 10. Click Next.
-
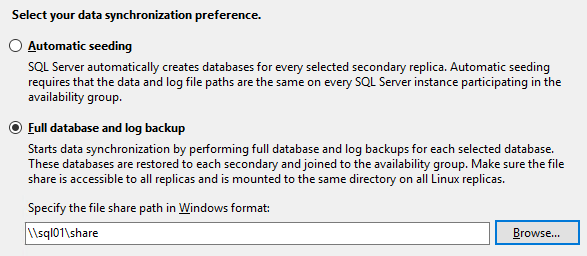
Either use Automatic seeding or create a simple file share on one of the servers that will be used for the initial replication. Be sure to set the correct permissions:
-
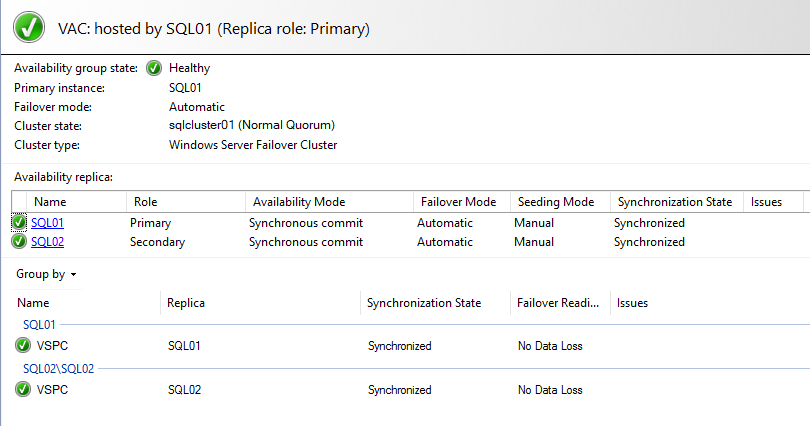
Run the validation to check that everything is good and complete the creation of the group. Open the Dashboard to see the group is up and running:
-
Finally we can go back into our application configuration and update the connection settings from a SQL standalone to the SQL listener to make use of the SQL Always On high availability.